|
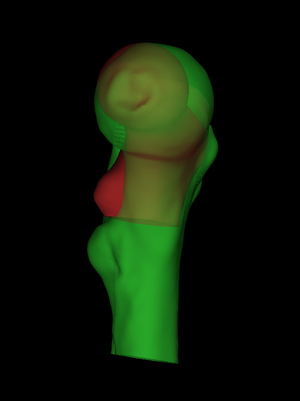
The first step is to load an individual's femur surface and also the canonical surface onto which we wish to map the cortical data (File->Load surfaces, select the two .ply|.wrl files by clicking on the first and ctrl-clicking on the second, or just select the individual's .ply|.wrl file and let wxRegSurf look for a canonical .ply|.wrl in the same directory). It is important that the canonical surface's filename includes the string canonical: this tells wxRegSurf that this is the "low resolution" (LR, red) surface that needs registering to the "high resolution" (HR, green) surface. It is also important that the canonical surface's filename includes the string femur, since there are some minor differences in the way wxRegSurf's algorithms are tuned for different bone types. Although wxRegSurf offers a number of different options for the registration transformations, we shall describe just one combination that we have found to work well with proximal femurs. We start with a nine degree-of-freedom aspect ratio registration (Registration->Aspect), which allows a rigid body transformation and independent scaling in the x, y and z directions. wxRegSurf calculates a rough, initial alignment by analysing the surfaces' shapes and topologies. If this fails, directly manipulate the LR surface (Mouse->LR surface, left/middle mouse button to rotate, right mouse button to translate, scrollwheel to scale, single click to reflect) until the surfaces are roughly aligned. |
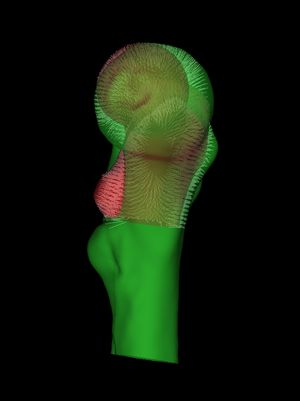 |
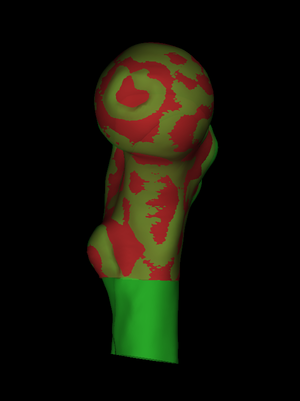
By default, wxRegSurf matches each vertex on the LR surface with the closest vertex on the HR surface, as long as the distance between the vertices is less than the Search range. To see these matches, click Show matches. wxRegSurf's registration algorithms aim to minimize the summed lengths of these matches. In this example, we see that there is a lot of work to be done. The individual's femur is a lot larger than the canonical femur and also different in shape. As well as being larger, the individual scan also extends much further down the femoral shaft. This is important: the canonical femur stops at the lesser trochanter and the individual scan must extend at least this far if we are to map its cortical data across. |
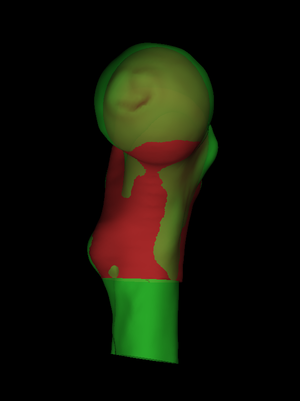 |
Next, we set the Iterations slider to something suitably high and press Start. At each iteration, wxRegSurf finds the transformation that minimizes the summed lengths of the matches and then recomputes the matches. After a short while this process converges to a stable alignment and we can either interrupt it (Stop) or wait until the iteration count is reached. |
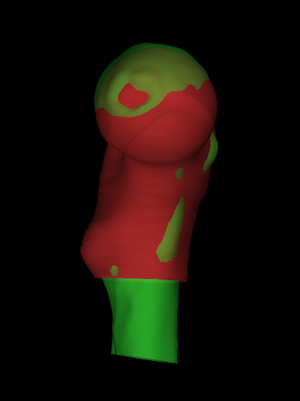 |
The nine degree-of-freedom aspect ratio transformation has brought the surfaces closer together, but we need to apply some nonrigid adjustments to finish the job. We could perform the nonrigid stage from this starting point (Registration->Aspect+FFD or Registration->Aspect+LAD), but then the individual femur's shape would be encoded in both the initial aspect ratio transformation and the subsequent nonrigid transformation. Often we are interested in the individual's shape as well as the cortical parameters, and for this reason we suggest selecting Registration->Similarity and then pressing the Aspect->Similarity button. This constructs a seven degree-of-freedom similarity transformation from the current aspect ratio transformation, preserving the z scaling but adjusting the x and y scales to match. Compared with a direct similarity registration, the Aspect->Similarity route tends to do a better job of aligning the lesser trochanters. |
 |
We are now in a position to apply a nonrigid transformation which will,
incidentally, fully encode the individual's shape (but not size, since this depends also on the similarity transformation). There are three options:
Similarity+FFD, Similarity+LAD and Similarity+SSM, where FFD indicates
a B-spline free form deformation, LAD indicates a locally affine
deformation and SSM indicates a statistical shape model. We did all
our early work with FFDs before switching to LADs, which we found to
perform better at the shaft rim where there is relatively little
information to guide the alignment.
The SSM option is available only when a valid statistical shape model has been loaded or calculated. We provide a suitable .ssm file containing a model trained on registrations of many femurs (the modes can be visualized using the controls in the Utilities tab). SSM registration is faster but less accurate than direct LAD registration. To perform the nonrigid registration, we set the Iterations slider to around 20 and select Registration->Similarity+LAD (preferable) or Registration->Similarity+SSM (if in a rush), before pressing Start. When complete, File->Save registration saves the alignment in .reg and .breg files. An unsuccessful registration may require some manual intervention. The most common failure mode involves misalignment of the lesser trochanters, with the canonical surface riding too high up the individual. If this happens, press the Reset button to reinitialize the LAD parameters, select Mouse->LR surface to directly manipulate the LR surface, use the scrollwheel to enlarge the LR surface until the lesser trochanters are approximately level, then run 20 or so Similarity+LAD iterations. |
 |
The next stage of the process is to load the cortical data for the HR
surface (File->Load surface data, choose between the sw
thickness file, sw density file and surface data
file filters, then select the appropriate .bin
file). wxRegSurf will quietly load any corresponding error file it
finds in the same directory: these contain precision estimates at each
vertex and are used to weight any data smoothing we might perform. The
filenames for the cortical data must terminate in either
_thickness.bin (Stradview thickness), _density.bin
(Stradview density) or _dat.bin (general surface data).
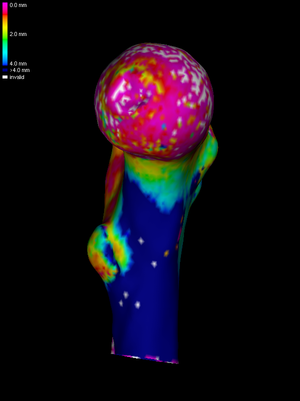
To see the data we have loaded, we select Surface shading->Surface data. In this example, we see a cortical thickness estimate obtained by deconvolution in Stradview v4.6. The white areas are where the deconvolution was not successful. |
 |
wxRegSurf maps each LR data value with its matched HR value (Show
matches). This sort of nearest neighbour mapping might at first
seem naive, but it is in fact perfectly adequate if used carefully in
conjunction with suitable smoothing. Data smoothing is, in any case, a
prerequisite for cohort analysis techniques like statistical
parametric mapping (SPM). Every time we press the Smooth
button, wxRegSurf replaces each data value with a weighted average of
immediately neighbouring values, with the weights set according to the
precision estimates found in the error file. If there is no error
file, uniform weighting is used.
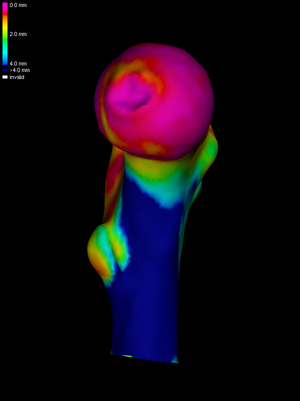
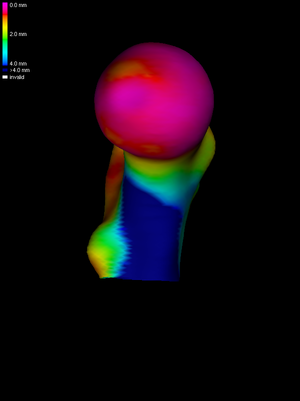
How much smoothing is necessary? For SPM, this depends on the resolution of the CT data and the expected effect size. Suppose we have determined that we need a 10mm full-width-half-maximum (FWHM) kernel. We need to calculate how many smoothing cycles are required to achieve this. The number will depend on the average edge length in the mesh. wxRegSurf helps by displaying an estimate of the current FWHM after each smoothing cycle. The image on the left shows the result of three smoothing cycles. |
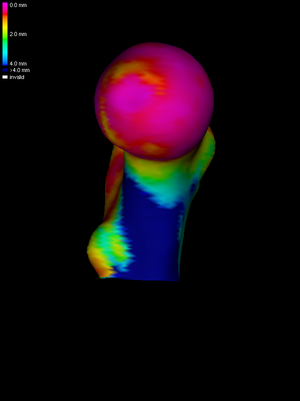 |
The next step is to map the smoothed HR data across to the LR surface. This is achieved by pressing the Map button. To visualize the mapped data clearly, without the obscuring clutter of the HR data, we uncheck the Show HR checkbox. |
 |
Finally, we perform four further smoothing cycles on the LR mesh, achieving (in this instance) approximately 10mm FWHM overall. Note that wxRegSurf smoothes any data that is currently displayed, so if we only wish to smooth the LR data we must ensure that the Show HR checkbox is unchecked. The smoothed and mapped data can be saved by selecting File->Save LR data. The saved files provide the input for subsequent SPM analysis. Splitting the smoothing between the HR and LR meshes is something we do routinely. Sufficient smoothing should be performed on the HR mesh to (a) remove all the invalid (white) data patches and (b) ensure that the subsequent nearest neighbour mapping stage adequately captures all the HR data in the vicinity of each LR vertex (wxRegSurf will warn if there is a danger of undersampling). Performing the rest of the smoothing on the LR mesh removes any noise caused by spatial imprecision in the nearest neighbour mapping (the matches are not necessarily orthogonal to either surface) and minimizes any potential bias caused by different average edge lengths in the individual meshes. |
We might wish to repeat this process for tens or hundreds of
bones. wxRegSurf provides a mechanism for sequential processing using
batch (.run) files. An example batch file is shown below. We
could cut-and-paste these lines into a file called, for example,
MyBatchFile.run. A batch file can be run from the user
interface (File->Load and run batch file) or by supplying its
name as a command line argument when wxRegSurf is invoked.
A batch file may include any number of blank or comment lines. The
first non-comment line contains the full path to the working
directory, where wxRegSurf will look for .ply|.wrl and
.bin files. Each subsequent line contains a set of
instructions for wxRegSurf to load files, process them and then save
the results. Draft batch files can be produced using wxRegSurf's automatic batch file writer, then edited
manually as required.
In the example above, the first line loads two surface files (but
no thickness or density files) and registers them with an aspect ratio
transformation (reg type is 0 for rigid, 1 for similarity, 2
for similarity+FFD and so on, mirroring the options in the
Registration choice control). Since the canonical surface is a
right femur and the individual scan is of a left femur, we need to
reflect the canonical surface before starting: hence the
reflect flag being set to 1. The search range is effectively
unconstrained (999). 200 registration iterations are performed before
the results are saved in a .reg file.
The second line performs 20 iterations of a similarity+LAD
registration, after first mapping the aspect ratio transformation to
the similarity transformation (this is indicated by the minus sign in
front of the 3 in the reg type field). The results are saved
in .reg and .breg files. We could fill the batch
file with hundreds of similar lines, registering different bones to
the canonical surface, and leave wxRegSurf to run unattended.
Following registration, we must check that all bones were aligned
satisfactorily. This is what the third line does in the example
above. It performs 200 iterations in "review" mode, whereby the
surfaces are loaded and spun around for the user to inspect. Lower
numbers of iterations reduce the inspection time, higher numbers
increase it. Alternatively, we could set the iteration count to zero,
in which case wxRegSurf instead saves a snapshot of the aligned bones
(.png) for offline inspection. Changing the review
flag from 1 to some other number saves a different view (1=front,
2=left, 3=back, 4=right, 5=top, 6=bottom). Any misregistered surfaces
must be corrected manually, with the updated results saved to the
.reg and .breg files.
The final line of the above example loads the HR cortical data,
performs three smoothing cycles on the HR data, applies the
similarity+LAD transformation, matches the LR and HR vertices over an effectively unconstrained search range, maps the smoothed HR data across to the
LR surface, performs a further four smoothing cycles on the LR surface
and then saves the smoothed and mapped data to a .bin file.
/path/to/surface/and/data/files/including/trailing/slash/

# LR surface              HR surface      LR data  HR data                   reflect  smth LR  smth HR  range  fussy    n iter  reg type  save reg  save LR data  save map  review       rims         save HR  match
#                                                                                                              -1=auto          -=as->sm            -1 = no                 0 = no       0 = no       surface  colours
#                                                                                                                                                   0 = yes                 1-6 = angle  1 = yes
#                                                                                                                                                   >0 = smth               - = LR only  2 = to rims

# aspect ratio registration
canonical_femur_5580.wrl  individual.wrl  n/a      n/a                       1        0        0        999    0        200     7         1         -1            0         0            1            0        0

# similarity+LAD registration
canonical_femur_5580.wrl  individual.wrl  n/a      n/a                       1        0        0        999    0        20      -3        1         -1            0         0            1            0        0

# review
canonical_femur_5580.wrl  individual.wrl  n/a      n/a                       1        0        0        999    0        200     3         0         -1            0         1            1            0        0

# map
canonical_femur_5580.wrl  individual.wrl  n/a      individual_thickness.bin  1        0        3        999    0        0       3         0         4             0         0            1            0        0